Imagine you’re in the middle of an important meeting or enjoying some quiet time, and your iPhone is on “Do Not Disturb” mode so that you won’t be interrupted by calls or notifications. But now the meeting is over, or you’re available again, and you want to make sure you don’t miss any important messages or calls. However, you’re not quite sure how to turn off this mode. “Do Not Disturb” is a handy feature, but it’s crucial to know how to manage it. Let’s walk through some straightforward methods to ensure you stay connected when you need to be.
Using the Control Center
Your iPhone’s Control Center offers the quickest and easiest way to manage “Do Not Disturb” settings. This panel gives you access to various phone functions without digging through your settings menu.
- Step 1: Swipe down from the top-right corner of your screen if you have an iPhone with Face ID. If your iPhone has a Home button, swipe up from the bottom edge of the screen.
- Step 2: Look for the crescent moon icon—it represents the “Do Not Disturb” function.
- Step 3: Tap the crescent moon icon to turn “Do Not Disturb” off. When it’s off, the icon will be deselected and no longer highlighted.
Turning off “Do Not Disturb” via the Control Center is swift and straightforward. It’s an efficient way to manage your focus without getting lost in your phone’s settings. However, remember that turning this mode off will allow all calls, alerts, and notifications to come through, so use this method when you’re ready to be reachable again.
Using the Settings App
The Settings app gives you a more in-depth approach to handle the “Do Not Disturb” feature and is another method to disable it.
- Step 1: Open the “Settings” app, typically found on your home screen with a gear-shaped icon.
- Step 2: Scroll down and tap on “Do Not Disturb.”
- Step 3: Toggle off the switch next to “Do Not Disturb.” It will turn from green to grey.
This method allows you to not only turn off “Do Not Disturb” but also customize it. You can set up schedules or allow calls from certain contacts even when “Do Not Disturb” is enabled. While it’s not as quick as the Control Center method, it offers you more control over how and when you want to disconnect.
Checking Scheduled Times
Sometimes “Do Not Disturb” is set to activate automatically during set times. You might want to check any schedules that you inadvertently set up or forget about.
- Step 1: Open the “Settings” app on your iPhone.
- Step 2: Tap on “Do Not Disturb.”
- Step 3: If “Scheduled” is switched on, you can toggle it off or adjust the times to your preference.
Understanding the scheduling function can prevent confusion about why “Do Not Disturb” turns on or off at certain times. It’s beneficial for those who want to automatically avoid disturbances during regular events such as meetings or sleep but can be frustrating if not managed properly.
Asking Siri for Help
For those who prefer voice commands or have difficulty navigating through settings, Siri can be quite helpful.
- Step 1: Activate Siri by saying “Hey Siri,” holding down the side button or the home button, depending on your iPhone model.
- Step 2: Once Siri is listening, say “Turn off Do Not Disturb.”
- Step 3: Siri will confirm that “Do Not Disturb” has been turned off.
Using Siri can be especially advantageous for hands-free situations or for those who might struggle with manual settings. It’s quick and requires minimal effort, making it a user-friendly option for many. However, be mindful that voice commands might not always be accurately interpreted, so check your “Do Not Disturb” status if you’re unsure.
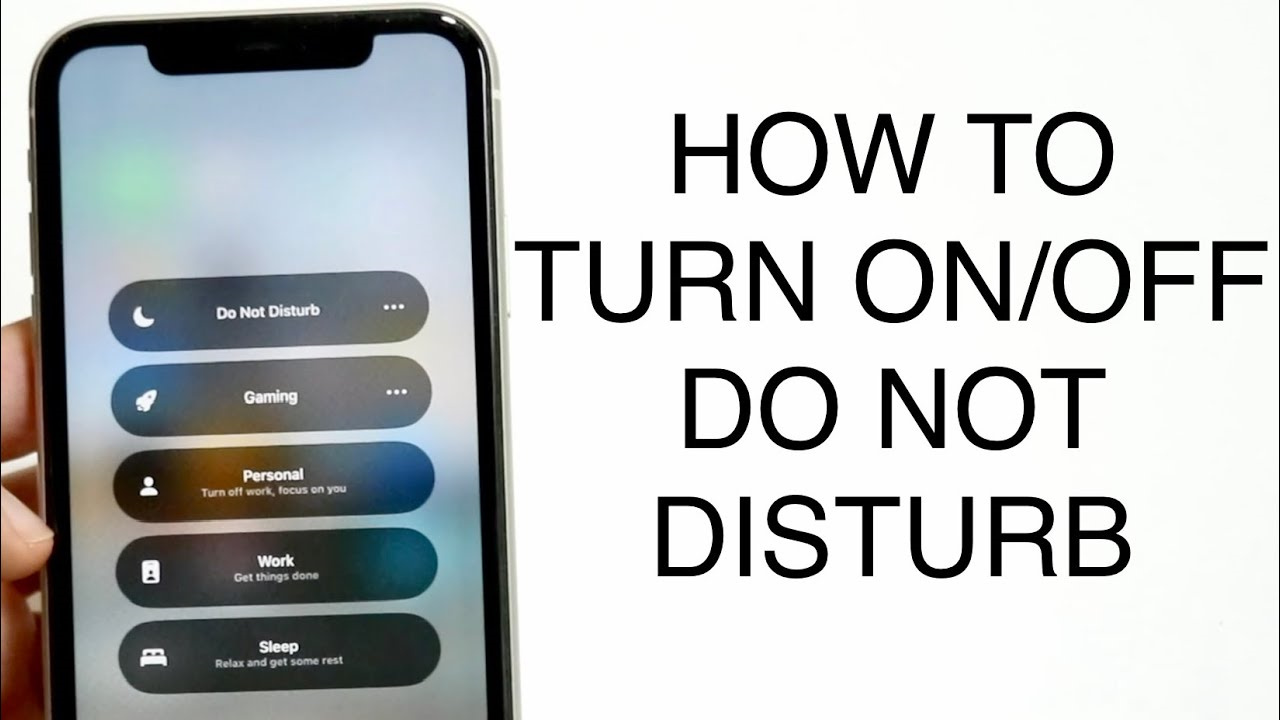
Reviewing the Focus Feature
With the introduction of iOS 15, “Do Not Disturb” has been incorporated into a broader system called Focus. It’s essential to understand how to manage this if you have updated your iPhone to iOS 15 or later.
- Step 1: Open the “Settings” app and scroll to find “Focus.”
- Step 2: Tap “Focus” and then select “Do Not Disturb.”
- Step 3: To turn off “Do Not Disturb,” disable it using the toggle at the top.
The Focus feature allows you to create customized modes that cater to different activities like work, driving, or personal time, with “Do Not Disturb” being one of them. While it may seem a bit more complex, this system offers a high level of customization for managing your attention during various activities.
Adjusting Automatic Disconnect Settings
If you find that “Do Not Disturb” keeps turning on unexpectedly, it might be worth exploring automatic rules that you’ve set previously. These settings adjust when “Do Not Disturb” activates based on location, time, or calendar events.
- Step 1: Enter the “Settings” app and tap on “Do Not Disturb.”
- Step 2: Scroll down to find and tap on “Automatic Rules.”
- Step 3: Here, you can adjust or delete the rules as desired.
By managing these rules effectively, you can ensure that “Do Not Disturb” only turns on when it’s truly convenient for you. Setting up automatic rules is a benefit for those who have consistent schedules but might inadvertently cause confusion if forgotten.
Exploring Smart Activation
“Smart Activation” is a nifty feature that uses machine learning to automatically enable “Do Not Disturb” at relevant times based on your habits and activities. If “Do Not Disturb” seems to turn on by itself, Smart Activation might be the cause.
- Step 1: Go to your “Settings” app and navigate to the “Focus” section.
- Step 2: Select “Do Not Disturb” and look for “Smart Activation.”
- Step 3: You can toggle this option off if you prefer manual control over “Do Not Disturb.”
Keep in mind that while Smart Activation can be useful by anticipating your needs, it may not always align perfectly with your daily life, and manual adjustments might be necessary.
Using Shortcuts Automation
For the tech-savvy or those looking to experiment, the Shortcuts app can be used to automatically manage “Do Not Disturb”.
- Step 1: Open the “Shortcuts” app.
- Step 2: Tap “Automation” and then the “+” sign to create a new automation.
- Step 3: Choose the conditions that will trigger “Do Not Disturb” to turn off.
Creating shortcuts offers a high degree of flexibility and can be an effective way to integrate “Do Not Disturb” management into complex routines. However, it can be slightly more technical for beginners and may require some experimentation to get right.
Updating Your iPhone
Sometimes, issues with features like “Do Not Disturb” can be a result of software glitches. Updating your iPhone to the latest iOS version can resolve these issues.
- Step 1: Launch the “Settings” app and go to “General.”
- Step 2: Tap “Software Update” and follow the prompts if an update is available.
Software updates often include fixes for common issues, and keeping your iPhone updated is a generally good practice for security and performance reasons.
Restarting Your iPhone
If all else fails, a simple restart of your device can sometimes resolve persistent issues with features such as “Do Not Disturb”.
- Step 1: Press and hold the side button and either volume button until the power off slider appears.
- Step 2: Drag the slider to turn your iPhone off.
- Step 3: After the device powers down, press and hold the side button again until you see the Apple logo.
Restarting can clear out minor software glitches and is a universal troubleshooting step for various issues.
Each method of disabling “Do Not Disturb” offers different advantages. Whether you’re looking for quick access, detailed customization, or advanced scheduling, there is an option for you. It’s essential to find a balance that suits your lifestyle and preferences. While the ability to disconnect can be beneficial for your focus and wellbeing, it’s equally important not to miss out on urgent communications. Thus, knowing how to manage “Do Not Disturb” effectively is a valuable skill for any iPhone user.
As you’ve seen, your iPhone offers various ways to control the “Do Not Disturb” function, each with its own benefits and drawbacks. It’s important to consider the context in which you’re turning “Do Not Disturb” off. Some methods offer rapid access and simplicity, while others afford you convenience and finesse over when and how you receive notifications. Once you master these steps, you’ll ensure you’re connected when it counts and undisturbed when you need peace.
FAQ
-
How do I know if “Do Not Disturb” is activated on my iPhone?
You can tell if “Do Not Disturb” is activated by looking for the crescent moon icon either in the Control Center or next to the time at the top of your screen. -
Can I allow calls from specific contacts even while “Do Not Disturb” is on?
Yes, within the “Do Not Disturb” settings, you can use the ‘Allow Calls From’ option to let calls from specific contact groups through even when “Do Not Disturb” is active. -
Does “Do Not Disturb” mute all sounds on my iPhone?
“Do Not Disturb” primarily mutes calls and notifications, but alarms and sounds from apps, music, or videos will still play while it’s activated.