OneDrive, Microsoft’s integrated cloud storage service, is seamlessly woven into the fabric of Windows 11, keeping your files in sync and accessible from any device. While its features are beneficial to many, you may prefer to manage your data locally or use a different service. Whatever the reason, you may find yourself looking for ways to reduce its presence on your computer. Thankfully, turning off OneDrive in Windows 11 can be as simple or comprehensive as you need it to be, depending on how far you want to take it. Let’s explore various methods to achieve this.
Unlink OneDrive Account
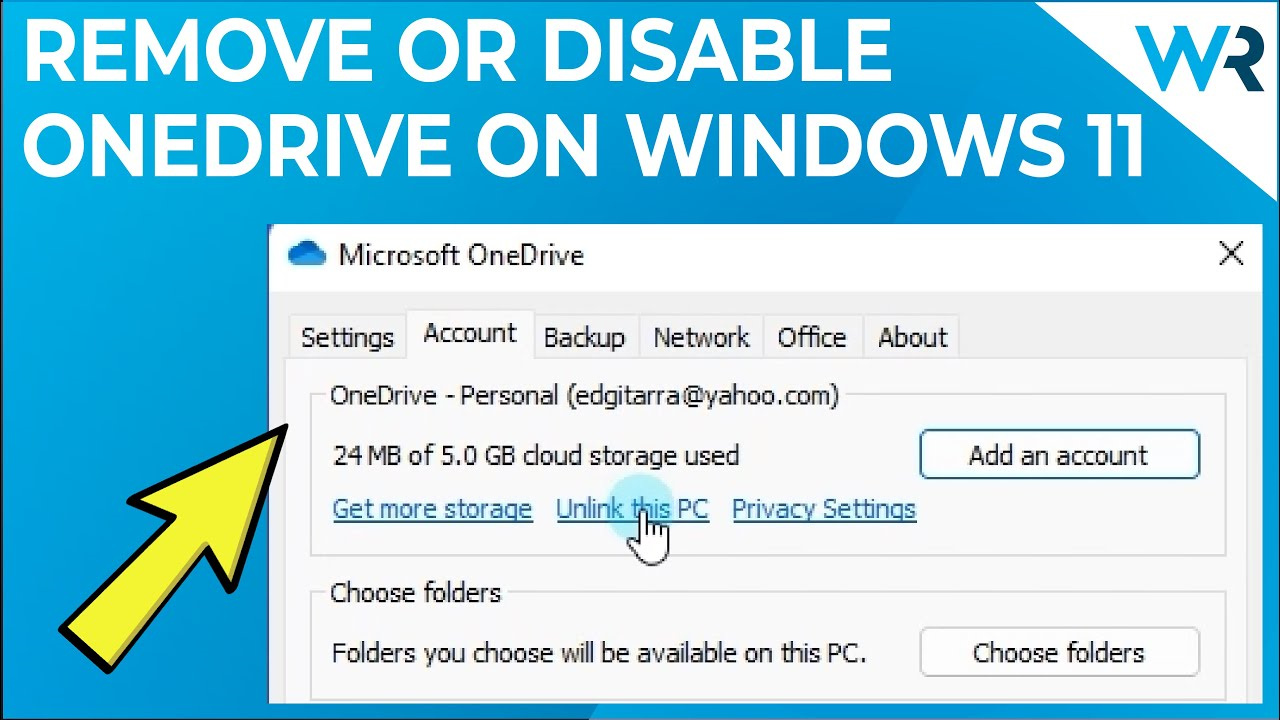
Before removing OneDrive completely, you might simply want to disconnect your account. This stops OneDrive from syncing, but it’s easily reversible should you change your mind.
- Click on the OneDrive icon in the Windows taskbar notification area.
- Click on the “Help & Settings” icon (a small cog), then select “Settings”.
- In the Settings tab, under the Account section, click on “Unlink this PC”.
- A confirmation window will appear. Click on “Unlink account” to confirm.
By unlinking your account, OneDrive will no longer sync your files. This is a non-destructive method that allows you to re-enable syncing quickly if needed, but OneDrive will still be operational and available should you wish to reconnect.
Pause Syncing Temporarily
If you want to stop OneDrive from syncing your files temporarily, this is a straightforward option.
- Click the OneDrive icon in the taskbar notification area.
- Click on “Help & Settings”.
- Select “Pause syncing” and choose the duration (2, 8 or 24 hours).
Pausing syncing gives you a break from continuous cloud updates, which may be useful when you need all your internet bandwidth or system resources for other tasks. This solution allows you to stop syncing without making any permanent changes.
Disable OneDrive at Startup
You can prevent OneDrive from automatically starting when you log into Windows, which effectively turns it off until you start it manually.
- Right-click the OneDrive icon in the taskbar notification area.
- Select “Help & Settings” and then “Settings”.
- In the Settings tab, uncheck “Start OneDrive automatically when I sign in to Windows”.
- Click “OK” to save your changes.
This method keeps OneDrive installed but out of the way. It won’t start unless you open it, letting you use your PC without OneDrive running in the background. The downside is that it still occupies space on your system and can be started manually or by other applications.
Sign Out of OneDrive
A more straightforward approach to stop syncing is to sign out of OneDrive entirely.
- Click the OneDrive icon in the taskbar notification area.
- Go to “Help & Settings” and select “Settings”.
- Under the Account tab, click “Sign out”.
Signing out is beneficial if you’re using a shared computer and don’t want others to access your files. The drawback is similar to unlinking your account; OneDrive remains installed and could be signed into again.
Use Group Policy to Disable OneDrive
For users with Windows 11 Pro, Enterprise, or Education, the Group Policy Editor offers a way to disable OneDrive.
- Press Windows key + R, type
gpedit.msc, and press Enter to open the Group Policy Editor. - Navigate to Local Computer Policy > Computer Configuration > Administrative Templates > Windows Components > OneDrive.
- Find the policy “Prevent the usage of OneDrive for file storage” and double-click it.
- Select “Enabled”, then click “Apply” and “OK”.
Group Policy changes are immediate and affect all users of the computer. It’s more permanent than other methods, so it should be used if you’re certain you won’t need OneDrive at all. Note that not all editions of Windows include access to the Group Policy Editor.
Remove OneDrive from File Explorer
Removing OneDrive from File Explorer just hides it from view but doesn’t turn it off.
- Open Registry Editor by pressing Windows key + R, typing
regedit, and hitting Enter. - Navigate to
HKEY_CLASSES_ROOTCLSID{018D5C66-4533-4307-9B53-224DE2ED1FE6}. - Set the “System.IsPinnedToNameSpaceTree” DWORD value to 0.
- Restart your computer.
This method will stop displaying OneDrive in the navigation pane, which could help reduce confusion or accidental use. Remember that this doesn’t affect OneDrive’s function and can be tricky for users not accustomed to editing the registry.
Remove OneDrive Using Command Prompt
Advanced users can uninstall OneDrive using Command Prompt.
- Open Command Prompt as an administrator by searching for “cmd” in the Start menu, right-clicking on it, and choosing “Run as administrator”.
- Type
taskkill /f /im OneDrive.exeto terminate any running OneDrive processes. - To uninstall OneDrive for the current user, type
%SystemRoot%SysWOW64OneDriveSetup.exe /uninstall(if you’re using a 64-bit system) or%SystemRoot%System32OneDriveSetup.exe /uninstall(if you’re using a 32-bit system) and press Enter.
After uninstalling OneDrive via Command Prompt, it’ll no longer be available on your computer. This method physically removes the application and can’t be easily undone, so make sure you’ve backed up any necessary data beforehand.
Turn Off Files on Demand
If your main concern is the disk space used by OneDrive, you can disable the Files On-Demand feature.
- Click the OneDrive icon in the Windows taskbar notification area.
- Go to “Help & Settings” and select “Settings”.
- In the Settings tab, under the “Files On-Demand” section, uncheck “Save space and download files as you use them”.
- Click “OK” to apply the changes.
Disabling Files On-Demand will make OneDrive download all your files to your PC, which could take up considerable space depending on how much data you have stored in the cloud. This is a good method if your internet connection is limited or you need immediate access to all your files offline.
Adjust Group Policy for Files On-Demand
Another method for Pro, Enterprise, or Education users to control Files On-Demand is through Group Policy.
- Open the Group Policy Editor by pressing Windows key + R, typing
gpedit.msc, and hitting Enter. - Navigate to Local Computer Policy > Computer Configuration > Administrative Templates > OneDrive.
- Find “Configure OneDrive Files On-Demand” and open it.
- Set the policy to “Disabled”, then press “Apply” and “OK”.
This method forcibly turns off Files On-Demand for all users, which could cause all files to be downloaded and occupy a lot of disk space. Make this change with consideration for the implications it might have on storage.
Turn Off OneDrive Completely for All Users
For those looking for a network-wide solution, or for IT administrators managing multiple computers, you can completely disable OneDrive using a script or through enterprise management tools.
This requires advanced knowledge of networking and group policy management. Creating a domain-level script or group policy change will disable OneDrive across all computers in the network. This isn’t recommended for individual users as it will affect everyone on the network. If this is necessary, consult with an IT professional or network administrator for assistance.
Summary
Each method to turn off OneDrive has its benefits and potential downsides. Unlinking your account or signing out are temporary and non-destructive, while pausing syncing is useful for short-term relief. Disabling OneDrive at startup, using Group Policy, or completely uninstalling OneDrive offer more permanent solutions, while adjusting the visibility in File Explorer and turning off Files On-Demand help manage local storage. Choose the option that best fits your needs, keeping in mind the permanence and reversibility of each.
Conclusion
Turning off OneDrive in Windows 11 isn’t a one-size-fits-all solution. Depending on your specific needs and technical comfort level, you can select a method that keeps your files local, conserves system resources, and aligns with your personal preferences for data management. Always remember to back up your important files before making any substantial changes to your system’s configuration.
FAQs
-
Will turning off OneDrive delete my files from the cloud?
No, turning off OneDrive on your PC will not delete the files you already have stored in the cloud. However, new changes won’t sync, and any files not already downloaded may not be accessible from your PC in offline mode. -
How can I turn off OneDrive without logging into my Microsoft account?
You can disable OneDrive at startup, use the Group Policy Editor, or uninstall OneDrive using Command Prompt to turn it off without logging into your account. -
Can I recover my OneDrive files if I accidentally remove the app?
Yes, as long as the files are still stored in the cloud, you can access them through the OneDrive web interface or by reinstalling the app and syncing your files again.