Windows 11 is designed with user-friendly features to make it easy for anyone to view their precious memories as dynamic presentations, right on their computer. One of these features is the slideshow, a fun way to display your pictures automatically. Whether you’ve returned from a trip with countless photos or want to relive fond memories without manually clicking through each image, setting up a slideshow is a breeze. Below, we’ll explore various methods to start enjoying your pictures in slideshow format and even throw in some tips and tricks to enhance your viewing experience.
Using Photos App
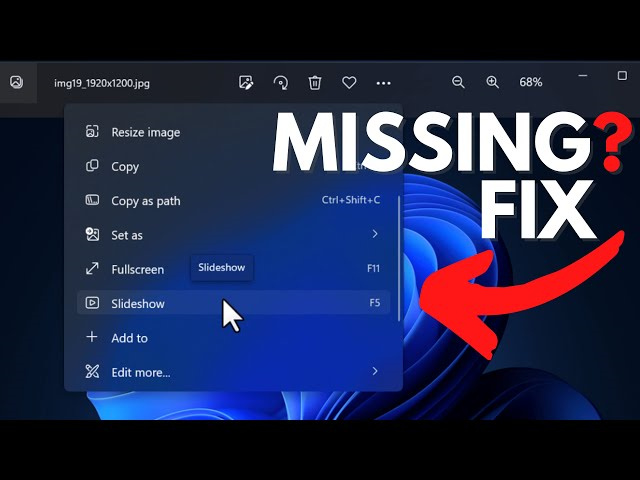
Windows 11 comes with a built-in app called ‘Photos,’ which is the default image viewer for your system. This app not only allows you to view individual pictures but also offers a slideshow feature.
- Open the Photos app by clicking the Start menu, typing ‘Photos,’ and selecting the app from the results.
- Navigate to the folder that contains the photos you want to use for the slideshow.
- Select a photo to begin.
- Click the ‘See more’ button (three dots in the upper right corner) and choose ‘Slideshow’ from the dropdown menu.
- The slideshow will start immediately, displaying each photo full screen and transitioning automatically.
The benefit of using the Photos app is its simplicity and accessibility since it’s built into Windows 11. One potential downside is that you have limited control over the slideshow settings, such as transition speed and the order of photos.
File Explorer Preview Pane
The File Explorer in Windows 11 has a preview pane feature that can display images one by one in a makeshift slideshow.
- Open File Explorer by clicking the folder icon on the taskbar.
- Navigate to the folder containing your images.
- Activate the Preview Pane by going to the View menu at the top and clicking on ‘Preview Pane.’
- Click on an image to preview it.
- Use the arrow keys on your keyboard to move to the next or previous image.
While this method is quick and doesn’t require opening a separate app, it doesn’t provide a true slideshow experience as you have to manually move between images.
Background Slideshow
Transform your desktop into a live photo album using the background slideshow feature.
- Right-click on the desktop and select ‘Personalize.’
- Click on ‘Background’ and select ‘Slideshow’ from the dropdown menu under ‘Background.’
- Click on ‘Browse’ to select the folder with your images.
- Choose how often you want the pictures to change under ‘Change picture every.’
This feature turns your desktop into a slideshow and can be a delightful surprise with each new picture displayed. However, this isn’t a traditional slideshow, as it functions in the background, and your screen can be obscured by open windows.
PowerPoint Presentation
Create a slideshow with Microsoft’s presentation software, PowerPoint, for additional control and customization.
- Open PowerPoint and select ‘Blank Presentation.’
- Click on ‘Insert,’ then ‘Pictures,’ to add your images.
- Add as many slides as needed, inserting one picture per slide.
- Go to the ‘Slideshow’ tab and click ‘From Beginning’ to commence your slideshow.
PowerPoint allows you to add transitions, timings, and even music to your slideshow, offering a customized experience. However, it might be considered overkill for those who simply want to view photos without extra flair.
Third-party Software
There are various third-party software options available that offer more advanced slideshow capabilities, such as IrfanView, FastStone Image Viewer, and others.
- Download and install your chosen third-party image viewer.
- Open the software and navigate to the folder with your pictures.
- Find the app’s slideshow feature, which is often found under a ‘View’ or ‘Slideshow’ menu.
- Customize your slideshow with the available settings and start it.
These programs often include more robust features, like music, transition effects, and more customizable slideshow settings. However, downloading and learning new software may be daunting for non-technical users.
Quick Look
Quick Look is a handy feature that allows Windows users to preview files and images simply by pressing the spacebar.
- Select the first image file in File Explorer.
- Press the spacebar to activate Quick Look.
- Use the arrow keys to navigate through the images as a manual slideshow.
This method is fast and doesn’t require any setup, but it is as bare-bones as it gets and doesn’t offer much in terms of a slideshow experience.
Lock Screen Slideshow
Similar to the background slideshow, Windows 11 can rotate pictures on your lock screen.
- Go to Settings by pressing Win + I.
- Click on ‘Personalization’ and then ‘Lock screen.’
- Under ‘Background,’ select ‘Slideshow’ and choose your images folder.
With the lock screen slideshow, your computer’s lock screen will feel personal and vibrant, although you only enjoy it briefly whenever you start or unlock your computer.
Cast to Device
Share your photos on a larger screen using the ‘Cast to Device’ feature if you have a compatible device like a smart TV or streaming stick.
- Open File Explorer and navigate to your images.
- Right-click an image, go to ‘Show more options,’ and choose ‘Cast to device.’
- Select your smart TV or streaming device from the list.
This is great for sharing photos with a group but relies on having the appropriate external hardware and network setup.
OneDrive Slideshow
If your images are stored online in OneDrive, use the in-built slideshow feature.
- Go to the OneDrive website and sign in.
- Navigate to your photos folder.
- Click on the first image and then select the ‘Slideshow’ button.
The OneDrive slideshow is convenient for those using cloud storage but requires an internet connection and may not be as fast as local methods.
Album Creation
Create an album in the Photos app which you can then view as a slideshow.
- Open the Photos app and go to the ‘Collection’ tab.
- Select the photos you want to include in your album.
- Click on ‘Add to’ and then ‘New album.’
- Once your album is created, you can view it as a slideshow.
This method gives you a way to organize photos thematically and enjoy them in a dedicated slideshow, but it takes a bit of time to set up initially.
Conclusion
Viewing your pictures as a slideshow in Windows 11 can be both entertaining and nostalgic. There are multiple ways to set this up, catering to different needs, whether you prefer a simple, automated display or a more customized presentation. With the tools provided by Windows 11 and additional software options, you can easily bring your digital photo collection to life.
FAQs
Q: Can I set a timer for how long each photo is displayed in a slideshow in Windows 11?
A: Yes, when using the Photos app or background slideshow, you can adjust settings for how long each photo is displayed.
Q: Do I need any special software to create a slideshow in Windows 11?
A: No, Windows 11 comes with built-in features like the Photos app and File Explorer preview that let you view slideshows. However, for more features, third-party software might be required.
Q: Can I add music to my slideshow within Windows 11?
A: While the Photos app doesn’t support adding music, you can create a slideshow with music using PowerPoint or third-party software that offers this feature.