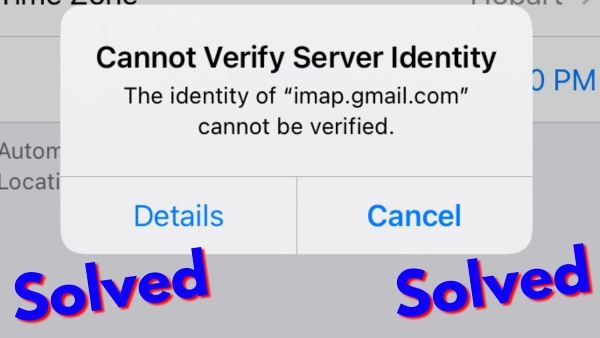
When you’re enjoying the seamless integration of your iPhone into your daily life, the last thing you want is a mysterious error message disrupting your routine. Yet, many iPhone users at some point may encounter an alarming notification: “Cannot Verify Server Identity.” This puzzling message is linked with email and browsing issues, appearing when your iPhone doubts the authenticity of the server’s identity it’s trying to connect to. Here’s where I intervene to guide you through resolving this pesky predicament with simplified solutions tailored for those who might not be tech aficionados.

Check Date and Time Settings
Many iPhone issues can stem from something as simple as incorrect date and time settings, which can lead to server verification errors due to mismatched time stamps. Ensuring the date and time on your iPhone are accurate is often a swift and easy fix.
- Open the “Settings” app on your iPhone.
- Scroll down and tap on “General.”
- Select “Date & Time.”
- Toggle on “Set Automatically.” This allows your iPhone to use your location to determine the correct date and time.
- If the issue persists, try toggling off “Set Automatically” and manually set the correct date, time, and timezone.
Having the correct date and time helps maintain the authenticity checks that servers perform. The benefit of this solution is its simplicity and the fact that it can solve other related issues. The downside is that it may not address deeper, more complex server verification issues.
Renew Lease of Wi-Fi Connection
Renewing the Wi-Fi lease can refresh your iPhone’s connection to your network, and in many instances, this restarts the process that checks the server identity.
- Go to “Settings” on your iPhone.
- Tap on “Wi-Fi.”
- Click on the “i” icon next to the Wi-Fi network you are connected to.
- Scroll down and tap “Renew Lease.”
This solution is useful in troubleshooting possible Wi-Fi-related issues, which is a common trigger for server identity errors. However, if the problem lies outside of the Wi-Fi connection, renewing the lease won’t solve the problem.
Trust the Certificate
If the certificate your iPhone is questioning is actually legitimate, you can choose to trust it manually, which should alleviate the error.
- From the error message, tap on “Details.”
- Tap on “Trust” in the top-right corner of the screen.
This trusts the certificate from that particular server, stopping the error message from popping up. However, it is important to only do this if you’re sure of the server’s integrity, as trusting a malicious server can compromise your data.
Reset Network Settings
Resetting network settings can clear any network-related issues you’re experiencing on your iPhone, including the server verification problems.
- Open “Settings.”
- Tap on “General.”
- Scroll to the bottom and select “Reset.”
- Choose “Reset Network Settings” and confirm your passcode if prompted.
This step effectively flushes your network configurations, which can resolve complex network issues. The downside is that you will lose any saved Wi-Fi passwords and custom network settings.
Update Carrier Settings
Carrier settings updates can improve network connectivity and performance, potentially resolving the server identity issue.
- Ensure your iPhone is connected to Wi-Fi or a cellular network.
- Open “Settings.”
- Tap on “General.”
- Choose “About.” If there is a carrier settings update, you’ll see an option to update your carrier settings here.
Updating carrier settings is generally risk-free and can even come with additional network enhancements. The only downside would be the rare case of an update introducing new bugs, which is uncommon.
Delete and Re-add Email Account
Sometimes removing and adding an email account afresh can solve the server verification problem by resetting the account’s connection settings.
- Go to “Settings.”
- Scroll down and select “Mail.”
- Tap on “Accounts.”
- Choose the account experiencing the issue.
- Tap “Delete Account” at the bottom and confirm the deletion.
- Go back to the “Accounts” page and choose “Add Account” to re-add your email account.
While this method can effectively resolve issues with specific email accounts, it can be slightly inconvenient since you have to re-enter account details and may lose any emails that were not synced with the server.
Close and Restart Mail App
Occasionally, a simple app restart can rectify minor glitches, including server identity verification errors.
- Swipe up from the bottom of your iPhone screen and pause in the middle to bring up the app switcher.
- Swipe left or right to find the Mail app.
- Swipe up on the Mail app to close it.
- Reopen the Mail app from your home screen.
Restarting an app is a quick and straightforward solution, with no real downsides unless the issue is more deeply rooted than a simple app malfunction.
Install iPhone Updates
iOS updates come with fixes for known issues and bugs that can include server identity errors.
- Connect your iPhone to Wi-Fi.
- Go to “Settings,” then “General,” and tap on “Software Update.”
- If an update is available, tap “Download and Install.”
Installing the latest iOS updates can help ensure that your device runs smoothly and is less susceptible to common errors. The main downside is that updates can sometimes take time to install and may occasionally introduce new issues, although this is rare.
Contact Your Email Provider or System Administrator
If the above steps haven’t fixed the issue, the problem might lie with your email provider’s server settings.
- Search online for your email provider’s help center or contact them directly through the support options they provide.
- If you’re using an email service provided by your job, contact your company’s IT department or system administrator for assistance.
Getting help from the provider or administrator ensures that the settings are configured correctly according to the server’s requirements. The downside is that it may take time to get a response and it often requires dependency on external support.
Factory Reset
A last-resort measure is to completely erase your iPhone and start fresh.
- Back up your iPhone using iCloud or iTunes to ensure you don’t lose any data.
- Go to “Settings,” select “General,” and then scroll down to tap on “Reset.”
- Choose “Erase All Content and Settings” and enter your passcode to confirm.
The benefit of this solution is that a fresh start can eliminate elusive bugs or configuration problems. However, it is time-consuming and should be used sparingly, as it removes all personal data and settings from the iPhone. Always make sure to have a backup before proceeding with this step.
In conclusion, the “Cannot Verify Server Identity” error on an iPhone is often a temporary setback that can be dealt with through a series of simple troubleshooting steps. These measures are crafted to assist even those who may not be comfortable with complex technological concepts, guiding you through a refined process to restore your device’s functionality. Always remember to back up your data before attempting more drastic solutions, and ensure that your device’s software is up-to-date to prevent future issues.
Frequently Asked Questions
-
What causes the “Cannot Verify Server Identity” error on an iPhone?
- This error typically occurs when the iPhone’s Mail app detects an issue with the SSL certificate used by the email server. It happens due to a range of reasons, including incorrect date and time settings, expired certificates, or issues with the mail server settings.
-
Is it safe to trust a server’s certificate when this error appears?
- You should proceed with caution. Only trust the certificate if you are certain about the server’s integrity, especially if you’re dealing with sensitive data or personal information. If unsure, check with your email provider or IT department first.
-
Will I lose my emails if I delete and re-add my email account?
- Typically, emails that are stored on the server will not be lost when you remove and re-add an email account. However, any emails that were downloaded and stored locally on the device without being synced to the server may be lost. It’s wise to back up important messages or confirm that your account is set to IMAP (which syncs with the server) instead of POP (which downloads messages locally) before deleting the account.


