Dealing with a DNS server issue can be frustrating, especially when you’re not sure where to start troubleshooting. DNS, which stands for Domain Name System, is like the phonebook of the internet, translating website names into IP addresses so browsers can load the resources. When there’s a problem with the DNS, your access to the internet can grind to a halt. This can be caused by a variety of factors, including software conflicts, incorrect network settings, or problems with the DNS server itself. Fortunately, Windows 11 offers a range of tools that can help diagnose and resolve these issues, even if you’re not tech-savvy. Let’s walk through some effective methods to get you back online swiftly.
Check Network Devices
Often, the root of DNS errors can be as simple as a glitch with your hardware devices. Power cycling these devices can resolve transient errors that might be causing DNS server issues.
- Turn off your computer.
- Unplug your modem and router. Wait for about 30 seconds to a minute.
- Plug in your modem and wait until it fully restarts; this is usually indicated by the lights returning to their normal status.
- Plug in your router and wait until it fully restarts.
- Turn on your computer and check if you can access the internet.
By doing this, you reset your network equipment, which can clear up temporary glitches. It’s a simple and often effective solution, but if it doesn’t work, it won’t have solved the underlying problem and additional troubleshooting will be necessary.
Use Windows Network Troubleshooter
Windows 11 includes a built-in Network Troubleshooter that can automatically detect and fix issues with your internet connection.
- Right-click on the Wi-Fi or Ethernet icon on the taskbar.
- Select Troubleshoot problems.
- Follow the prompts to let Windows diagnose and fix the network issues.
This utility can often resolve DNS errors without additional input, but it doesn’t always catch every possible issue, and sometimes it will not be able to fix the problem, leaving you to troubleshoot further.
Flush DNS Cache
Your system stores DNS information to speed up browsing, but sometimes this cache can become outdated or corrupt.
- Open the Command Prompt as administrator: Search for ‘cmd’, right-click on the ‘Command Prompt’ app, and select ‘Run as administrator’.
- Type ipconfig /flushdns and press Enter.
This step clears the cache, potentially resolving DNS errors caused by outdated or corrupt entries. However, it assumes that the issue is with your local cache and not with the server itself.
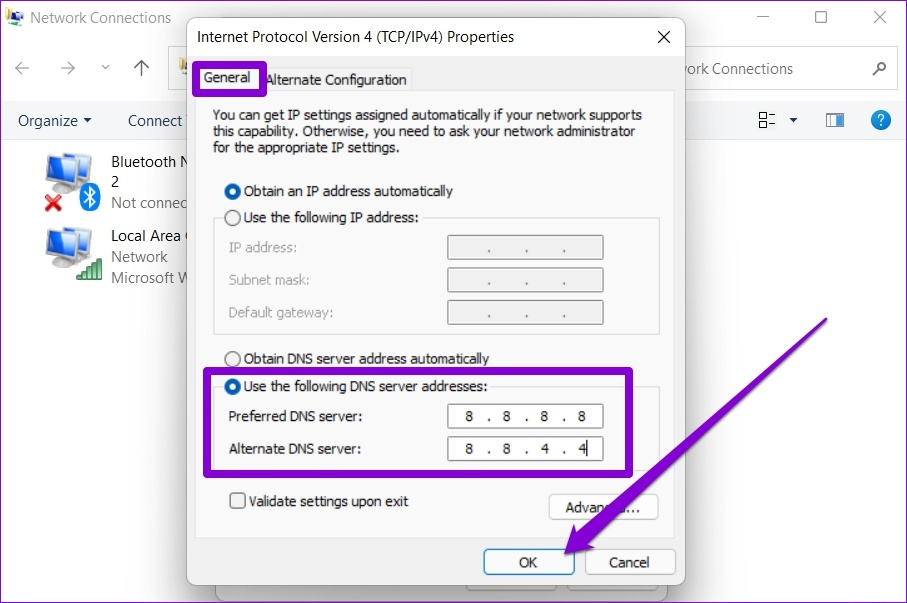
Change DNS Servers
Sometimes the default DNS servers provided by your ISP may not respond. You can switch to public DNS servers like Google’s or Cloudflare’s.
-
Open Settings > Network & Internet.
-
Click on Wi-Fi or Ethernet, depending on your connection type.
-
Click on your network and find the IP settings section.
-
Select Manual, then turn on IPv4.
-
Set the DNS servers to:
- Primary DNS: 8.8.8.8 (for Google) or 1.1.1.1 (for Cloudflare)
- Secondary DNS: 8.8.4.4 (for Google) or 1.0.0.1 (for Cloudflare)
Switching DNS servers can bypass problems with your ISP’s DNS, but if you’re not comfortable changing these settings, you may want to seek assistance or proceed with caution.
Update Network Adapter Drivers
Out-of-date network drivers can lead to all sorts of connectivity issues, including DNS errors.
- Open Device Manager: Search for ‘Device Manager’ and open it.
- Expand Network adapters, right-click on your network device, and select Update driver.
- Choose Search automatically for updated driver software.
Keeping drivers updated helps to ensure compatibility and reliability, but sometimes an update might actually introduce new issues if not stable.
Reset Network Settings
As a more drastic step, restoring network settings to their defaults can clear up stubborn issues, including DNS ones.
- Open Settings > Network & Internet > Advanced network settings.
- Scroll down to Network reset.
- Click on Reset now.
This process will remove all network information from your PC, which means you’ll have to reconnect to networks and reconfigure settings. It can be very effective but does require you to set up your connections again.
Turn off Peer-to-Peer Update Sharing
P2P update sharing can sometimes interfere with your network performance.
- Open Settings > Windows Update.
- Click Advanced options.
- Scroll down to Optimize delivery and turn it off.
This will stop your PC from sending or receiving updates from other PCs on the internet, which might improve DNS response but also slow down future Windows updates.
Disable IPv6
Some users report that disabling IPv6 can resolve DNS errors.
- Open Control Panel > Network and Sharing Center.
- Click on your connection, then click Properties.
- Uncheck the box next to ‘Internet Protocol Version 6 (IPv6)’.
While this can fix some connectivity issues, turning off IPv6 can make your network less future-proof as the internet transitions towards this newer protocol.
Check for Windows Updates
Running outdated versions of Windows can be a source of DNS issues.
- Open Settings and go to Windows Update.
- Click on Check for updates and install any available updates.
Keeping Windows up-to-date is important for security and stability, but unexpected issues can occur with new updates on rare occasions.
Disable Additional Connections
Multiple active network connections can sometimes conflict with each other and cause DNS errors.
- Go to Control Panel > Network and Internet > Network Connections.
- Right-click on any connections you’re not using and select Disable.
This can prevent conflicts, but remember which connections you’ve disabled in case you need to enable them again in the future.
Conclusion
Having your DNS server not responding on Windows 11 is annoying, but these troubleshooting steps are designed to tackle common causes and get your system back in shape. From simple restarts to a bit of system tweaking, one of these solutions could be the key to resolving your issues and keeping your internet experience smooth and uninterrupted.
FAQs
Q: What is a DNS server and why is it important?
A: A DNS server translates human-friendly domain names into IP addresses that computers use to communicate with each other. Without a functioning DNS server, you wouldn’t be able to browse the internet using domain names.
Q: How do I know which of these fixes to try first?
A: Start with the simpler fixes, like checking network devices and using the Windows Network Troubleshooter, before moving on to more complex solutions like changing DNS servers or updating network drivers.
Q: Can I cause any permanent damage to my computer by following these steps?
A: No, these steps are safe to perform and are meant to diagnose and fix common issues without risking damage to your system. However, if you’re unsure about a step, it’s always best to consult with someone who has a bit more technical expertise.