In a world where data is constantly shared and transferred, a common format you might encounter for compressed files is the .gz extension, known as “gzip”. This type of file helps save space and speed-up file transfers. If you’ve stumbled upon a .gz file and are unsure how to access its contents, don’t worry. In the guide ahead, you’ll learn what a gz file is and discover different ways to unzip it, enabling you to access the information it contains.
Using Built-in Operating System Tools
Regardless of whether you’re using Windows, macOS, or Linux, your operating system often has built-in capabilities to handle .gz files. For those not tech-savvy, think of a .gz file like a packed suitcase. Before you can access what’s inside, you need to “unpack” it, and your computer already has the basic tools for this task.
Detailed Steps
-
For Windows Users:
- Locate the .gz file in File Explorer.
- Right-click on the file and select “Extract All…” if available.
- Follow the on-screen instructions to decompress the file to your desired location.
-
For macOS Users:
- Open Finder and locate your .gz file.
- Double-click the file to automatically extract its contents with Archive Utility.
-
For Linux Users:
- Open the terminal.
- Navigate to the directory containing the .gz file using
cd /path/to/directory. - Type
gunzip filename.gzand press Enter.
Summary
Built-in tools are the most direct way to handle .gz files, requiring minimal technical know-how. However, they might lack certain features found in specialized software, such as batch extraction or advanced compression options.
Using WinRAR or 7-Zip for Windows
WinRAR and 7-Zip are popular third-party tools that offer a user-friendly way to manage .gz files among other archive formats. They provide a graphical user interface that simplifies the unzipping process.
Detailed Steps
-
Download and Install WinRAR or 7-Zip:
- Visit the official website of WinRAR or 7-Zip.
- Download the installer that matches your Windows version (32-bit or 64-bit).
- Follow the installation prompts to install the software.
-
Unzip a .gz File:
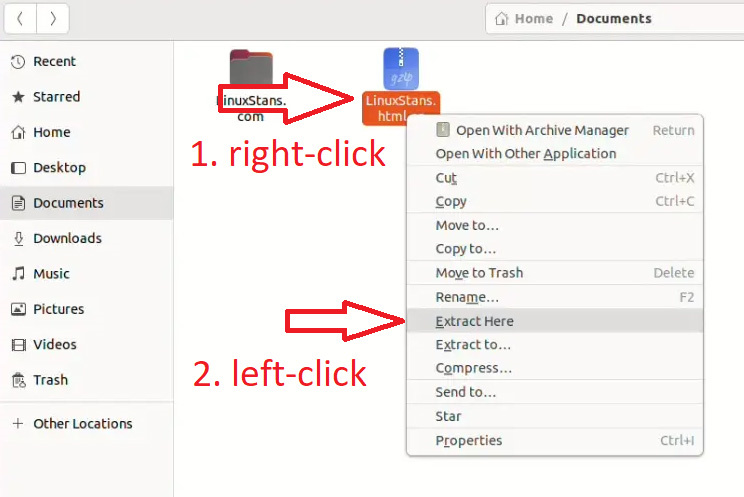
- Right-click on the .gz file.
- Hover over the WinRAR or 7-Zip options in the context menu.
- Select “Extract Here” or “Extract to <folder name>”.
Summary
Employing tools like WinRAR or 7-Zip can streamline your unzipping experience through their powerful features and simple interfaces. While they are free to try, note that WinRAR is not free software, and after the trial, you’ll be prompted to purchase a license.
The Unarchiver for macOS
For those using macOS, The Unarchiver is a more robust alternative to the default Archive Utility, offering support for more file formats and additional functionality.
Detailed Steps
-
Download and Install The Unarchiver:
- Find The Unarchiver in the Mac App Store and download it.
- Once installed, launch the app to ensure it’s set as the default archive utility.
-
Unzip .gz Files:
- Right-click on the .gz file in Finder.
- Choose “Open With” and select “The Unarchiver”.
- Specify the extraction path if prompted and begin the extraction.
Summary
Choosing The Unarchiver as your default solution can greatly expand the types of compressed files you can easily access on a macOS system. It’s a free tool but can sometimes struggle with exceptionally large files or rare archive formats.
Using Online Services
There are also web-based tools that can decompress .gz files, which is convenient for those who prefer not to install additional software. These services are accessible from any browser and usually offer a simple drag-and-drop interface.
Detailed Steps
-
Choose an Online Service:
- Open your web browser.
- Navigate to a website such as CloudConvert, Archive Extractor, or Zamzar.
-
Unzip .gz Files Online:
- Follow the site’s instructions to upload your .gz file.
- Wait for the service to decompress the file.
- Download the uncompressed files back to your computer.
Summary
The benefits of using an online service include convenience and the ability to use it across different operating systems without installing software. The trade-offs can include slower speeds, potential privacy concerns, and size limits on files.
Using Terminal on macOS and Linux
Mac and Linux users can employ the power of the Terminal to unzip .gz files using simple command-line instructions.
Detailed Steps
-
Open Terminal:
- macOS: Launch Terminal from the Utilities folder or by using Spotlight search.
- Linux: Open Terminal using your distro’s preferred method.
-
Unzip .gz Files with Commands:
- Navigate to the directory containing the .gz file using
cd /path/to/directory. - Use the command
gunzip filename.gzto extract the contents to the current directory.
- Navigate to the directory containing the .gz file using
Summary
Using the Terminal may seem daunting to novices, but it provides an efficient and quick method for managing .gz files. The drawback is the learning curve involved in becoming comfortable with command-line interfaces.
PeaZip for All Platforms
PeaZip is a cross-platform file compression tool that works on Windows, macOS, and Linux. It’s an open-source alternative for managing compressed files and supports a wide range of archive formats.
Detailed Steps
-
Download and Install PeaZip:
- Go to the PeaZip official website.
- Download the version of the software suitable for your operating system.
- Follow the installation instructions provided.
-
Unzip .gz Files with PeaZip:
- Open PeaZip and navigate to the .gz file you wish to unzip.
- Select the file and click the “Extract” button, then choose your desired output folder.
Summary
PeaZip may be a perfect middle ground, offering both the depth of functionality and ease of use across multiple operating systems. However, it might offer more features than the average user needs, which can be overwhelming at first glance.
Tips and Tricks
-
File Associations:
Setting your preferred compression software as the default for opening .gz files can save you time. -
Backup Before Unzipping:
Make a copy of the original .gz file before extracting it, just in case something goes wrong during the process. -
Watch for Multiple Layers:
Sometimes, .gz files can contain another compressed archive. Be prepared to repeat the extraction process. -
Update Your Software:
Keeping your compression software updated ensures compatibility and security. -
Use Caution with Online Tools:
Be mindful of the files you upload to online services, as there may be privacy implications. -
Consider File Paths:
When extracting files, be aware of the file path to ensure you can easily find the uncompressed files later. -
Maintain System Health:
Regularly clear your temporary files and downloads to keep your system running efficiently.
Conclusion
Navigating the .gz file format doesn’t have to be daunting. Whether you prefer the simplicity of built-in OS tools, the robust features of third-party software, or the convenience of online services, you’re now equipped to tackle these compressed files with confidence. Remember to choose the method that best aligns with your technical comfort level and privacy requirements.
FAQs
-
What is a .gz file?
A .gz file is a Gzip compressed file used for file compression and archiving, which helps in reducing file size and facilitating quicker file transfers. -
Can I unzip a .gz file on my mobile device?
Yes, there are mobile apps available that can unzip .gz files. For Android and iOS, you can search the respective app stores for a file compression app that supports .gz files. -
Can I accidentally unzip a virus from a .gz file?
Like any file, .gz archives can contain malware. Always ensure you trust the source of the file and have good antivirus software installed before unzipping files.